One Pot Brewing v3: Stainless Steel

So Zymurgy paid me money to write an article about One Pot Brewing. I decided to spend some of that money on…you guessed it.

With jealous eyes, I’ve touted the benefits of using an aluminum pot, rather than the standard stainless steel that homebrewers seem to love and adore. Aluminum is lighter, it gets to a boil faster, and it’s cheaper. Except check this out!

Bayoo

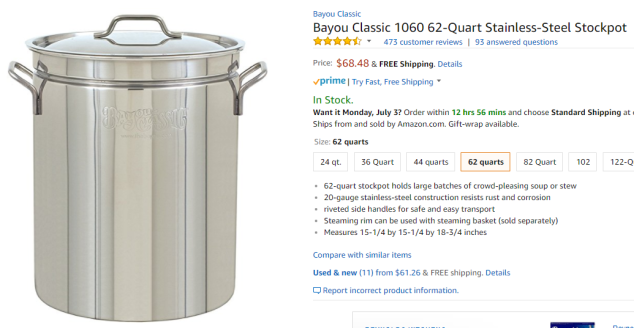
So I bought it, along with the other necessary attachments:

IMG_20170801_124928169

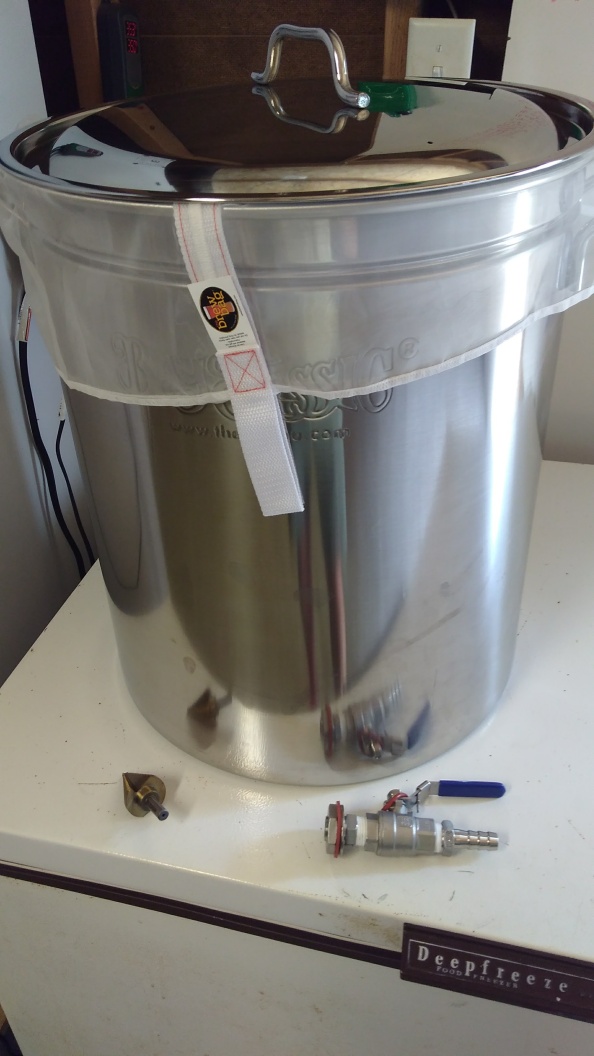
Super big pot, fitted Brew Bag, Stainless spigot (or whatever those are called), step bit, and cutting lube, and–roughly $150 bucks later–a new and improved One Pot Brewing system was born. Although an airlock would be easy to add, I don’t see the point.

Where to put the hole for the spigot? This was something I learned from the aluminum pot set up. I decided to place the hold a little bit higher, 2 1/4 inches from the bottom, giving a solid 2 inches for gunk. I didn’t want to bother with hop sacks, or tilting the pot. This should give me plenty of room. Plus, for low hopped smaller gravity beers, I plan on doing 10 gallon batches. It’s better to place the spigot conservatively; after all, while transferring, you can always tilt the pot towards you, in order to get all the beer you can.

Cutting the hole with lube was fairly simple, even for me. youtube it.

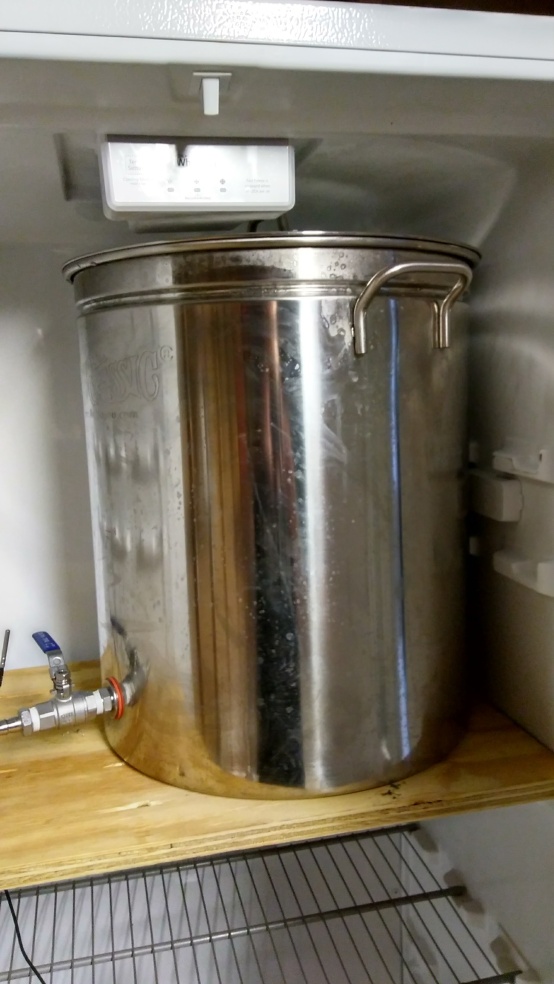
Only problem: it barely fits in the freezer. I might have to do some cutting of plastic or something.

IMG_20170813_193501412_HDR

Using a Wort Chiller with One Pot Brewing

While my method doesn’t require extra stuff, it’s certainly compatible with it. Like a manufactured home, upgrade according to your taste and budget. For most brewers, a wort chiller is a required piece of equipment. It quickly gets the unfermented beer cold enough to add yeast, thus reducing the risk of infection and moving on with the process. But, since they are expensive and not absolutely necessary for brewing good beer, I never took the plunge. From the beginning, I chilled in my bathtub, which works just fine, although it’s not the cleanest environment in the world. Recently, after getting a fermentation fridge that gets really cold, I decided to stop chilling altogether, using a no chill method: simply throw the hot unfermented beer in the fridge for 18 hours and then add the yeast. This also seems to work just fine. But, especially with an old fridge, it takes a while. The main drawback with no chill, however, is hoppy beers. IPAs can come out too bitter. For me, that’s a problem because I make a lot of them.

Enter wort chiller.

IMG_20160717_163807706

So I borrowed my friend’s wort chiller, just to experiment with yet another method for chilling: the partial chill method. If you’re a rabid fan of brulosophy.com like me, you might be familiar with how it works. Basically, you chill the beer to 100F, or 80F, or whatever temp you want (depending on the season), and then you let it finish chilling in the fermentation chamber. After trying it on my latest two batches, I really like this idea. It sounds more complex than it really is. It’s fast, convenient, and consistent with quality brewing practices. I adds only about 7 minutes to the brewday, and cleaning literally takes a minute.

Yesterday, for example, I brewed a Belgian Golden Strong Ale in exactly 1 hour, 31 minutes, while my 2 year old son was taking a nap. 30 minute mash, 25 minute boil, chilled for about 7 minutes or so, had the fermentation chamber set to -10C, and let the beer finish chilling for a few hours in the fermentation chamber before pitching the yeast. That’s what I love about One Pot Brewing: at the drop of a hat, providing you have ingredients on hand, you can simply brew a beer and get on with your day.

Auto Siphons are Dead to Me

A few batches back, I threw away my auto siphon forever. It felt so good. It seems like every time I try to use this awkward device, something goes wrong. It makes no sense, it should be easy. It slips, it gets clogged, it pushes oxygen into the beer, it falls, the clamp isn’t good, I have to constantly pump it, etc. I’m either not alone in my hatred for siphoning, or I have a bad product, or I’m a stupid fucking idiot. I’m fine with all three. But as for me, I have parted ways:

IMG_20160129_144359173

There are three things I like most about my One Pot Brewing method: less cleaning, less time, and, now, no siphoning. Luckily, transferring is no problem, if I so desired. Simply attach a plastic hose to the spigot and use gravity.

Why I bought a Barley Crusher

Efficiency and convenience (and Cyber Monday savings) got the best of me with this purchase. The ‘Cereal Killer’ grain mill gives me two things: first, a finer crush, allowing me to squeeze more alcohol out of each precious pound of barley that I put into each beer recipe; which, incidentally, is a huge benefit with BIAB not available to the traditional brewer. How fine? Credit card fine. Following advice from brulosophy.com, I set my mill to credit card thin. The second reason I made this purchase is having the convenience of buying a recipe in advance, so that I can brew it whenever I want. So, for example, yesterday I bought the ingredients for an IPA. I will brew it tonight. It’s all about making brewday faster and more convenient. Previously, going to the store, crushing the grains, and buying them added about 45 minutes to my brewday. Crushing my own grains doesn’t make the brewday any longer; I simply crush the grains while I’m waiting for the mash water to warm. Lastly, I like the idea of having the freshest crushed grains imaginable, although I have no clue whether that matters (my coffee snobbery coming out probably…I roast and crush my own coffee beans for similar reasons).

cereal-killer-malt-mill-other-side-th.jpg

For 80 bucks (normally $130) it was worth it, although I would be completely happy without it and would never tell anyone to get one. It’s extra, not needed, one of those convenience buys. I can’t wait to use it tonight though.

TIP: Crush directly into your BIAB bag.
Extra equipment needed: power drill and bucket. Put your BIAB bag into a bucket, then place the barley crusher on top of the bucket, then crush the grains directly into your bag. Now, once the mash water is ready, simply dump the bag full of grains into it. This method works best for me.

This damn hobby. Always in search for the ‘perfect’ system. Until I become convinced of kegging, this is all the equipment I will want for 2016. Well, I take that back. I would love to have a utility sink in my garage, where I brew. That would be awesome. Lol.